Tools || (new) features || blog posts in a bit format on topics that I'm excited about.
Join my weekly newsletter to receive my latest blog posts and bits, directly in your inbox.
49. Playwright v1.45 makes you a Time Wizard
The latest release of Playwright, version 1.45, introduces a new feature called Clock. This feature allows you to manipulate the time in your tests, making it easier to test time-sensitive scenarios.
Additional Resources
48. Inferred Type Predicates
It's finally here! While working with TypeScript, I assume we all have been in a situation where we have to write a type predicate to help TypeScript understand the type of a variable. For most cases this is fine, but it can be a pain to write these while using the filter method.
Now with the TypeScript 5.5 release, TypeScript introduces a new feature called Inferred Type Predicates. This feature allows TypeScript to infer type predicates automatically. This means that TypeScript can now understand the type of a variable or return value based on the conditions that are checked in the code.
Functions that previously required a Type Predicate can now be simplified. This is a great improvement for developers, as it reduces the amount of boilerplate code needed to write type predicates.
Take a look at the following TypeScript playground examples to see the difference between TypeScript 5.5.0-beta and TypeScript 5.4.5.
Additional resources
- Announcing TypeScript 5.5 RC by Daniel Rosenwasser - the official announcement of the feature
- The Making of a TypeScript Feature: Inferring Type Predicates by Dan Vanderkam - why and how Dan implemented this feature
- Type Predicate Inference: The TS 5.5 Feature No One Expected by Matt Pocock - a detailed explanation of the feature (with examples)
47. Automatic Service Discovery and Registration using Scrutor
Scrutor, created by Kristian Hellang, is a library that extends the functionality of the built-in ASP.NET Core Dependency Injection (DI) container (Microsoft.Extensions.DependencyInjection).
The name "Scrutor" is derived from the Latin verb "scrutor", which can be translated as "explore" / "search" / "examine thoroughly". And that's exactly what Scrutor does: it allows you to scan assemblies for specific types.
Before Scrutor, we have to manually register the dependencies in the DI container. The problem with this approach is that as your application grows, maintaining this list of registrations can become cumbersome.
Enter Scrutor, to simplify this process! It provides a fluent API that allows automatic assembly scanning and dependency registration. The API provides a flexible (and clean) way to discover types that meet the specified criteria (e.g. a specific name condition), and define the configuration options (e.g. service lifetimes) that are used for their registration within the container.
Because this significantly improves the developer experience, I encourage you to explore its capabilities and give it a try. Once you’ve experienced the convenience of Scrutor, manual registration will feel like a thing of the past!
To start using Scrutor, add the package to your project using the following command:
Additional resources
- Using Scrutor to automatically register your services with the ASP.NET Core DI container by Andrew Lock
- Improving ASP.NET Core Dependency Injection With Scrutor by Milan Jovanović
46. Interacting with GitHub through the GitHub CLI
Throughout the last few years, GitHub has provided us with more and more tools that improve the experience with their platform. The development never stops, and new features are added frequently. This can be seen in the GitHub UI, but it reaches more than that.
One of the tools that I use daily is the GitHub CLI. The GitHub CLI is a command-line tool that brings GitHub directly to your terminal and enables you to interact with GitHub through various commands.
For me, the GitHub CLI makes contributing to open-source projects simpler and faster. For most of the tasks, the CLI provides a single command that can be used to perform the task, which otherwise could require multiple steps. The commands are easy to remember and are also suggested via the GitHub UI, which makes it easier to get started.
Here are some of the commands that I use frequently:
Of course, there are many more commands available, to explore them see the GitHub CLI documentation. To take it a step further, you can also create extensions for it. An example is the gh dash, which provides a dashboard for your pull requests and issues in which you're participating. Instead of using the commands to query issues or repositories, you can use the dashboard to get a nice visual overview.
Besides using the GitHub CLI with GitHub, I'm catching myself using the gh copilot command more and more.
This command uses GitHub Copilot to answer your questions and generate commands that can be executed or copied.
I find it a useful way to learn new commands or to get a quick reminder of how to use a command.
To bring the power of the GitHub CLI to your IDE, you can also install GitHub extensions for your favorite IDE. These will make it easier to review pull requests directly from your IDE.
For one-off tasks while working in repositories you don't frequently visit, a GitHub codespace is a great way to quickly spin up a (pre-configured) development environment with all the tools that are required.
45. Empathy Matters (as a Software Developer)
The most challenging aspect of software development isn't the technical side of the coding process, but rather the human interactions involved. To quote Gerald M. Weinberg, "No matter what the problem is, it's always a people problem".
This is something I've heard in some variations by experienced developers and leaders over the years, and the more experience I gain the more I think it's true. From my own experience, I can say that most of the problems I've encountered were (more or less) solvable from a technical side. The real challenge was to understand, really understand, the problem and the people involved.
True, as you're starting your career, you're focused on learning the technical skills, and that's important. However, as you advance, you'll realize that people (soft) skills are equally, if not more, vital.
Empathy, in my opinion, plays a crucial part in connecting with people and understanding the way they feel and how they express themselves. It’s an essential skill that fosters both personal and professional relationships. From a software development side, mastering empathy enables you to collaboratively build a better product as a team. Teams that actively listen to each other and effectively communicate their emotions and thoughts with the aim of mutual understanding are the ones that deliver the best results.
Recently, I came across a piece by Jacob Morgan on the practice of empathy that I thought would be beneficial to share. Here's a brief excerpt from the post outlining a four-step method to cultivate empathy (the complete article can be accessed via the source link provided):
- Perspective taking, or putting yourself in someone else’s shoes. Imagine things from their point of view.
- Stay out of judgment and listen. Don’t rush into judgment; focus on listening to the other person.
- Recognize the emotion the other person is feeling. Think of a time you have felt similarly.
- Communicate that you recognize that emotion. Sharing understanding builds trust and connection.
Source: 4-Step Approach to Practicing Empathy by Jacob Morgan.
44. Enforce module boundaries with no-restricted-imports
Define module boundaries in your project by restricting specific imports using ESLint's no-restricted-imports rule.
The rule allows you to prevent certain modules from being imported in specific files or directories.
From an architectural point of view this is useful to enforce module boundaries e.g. to prevent feature A to be imported within feature B, or prevent circular dependencies between modules.
There are also some alternative tools that allow you to define module boundaries such as Sherrif or Nx. If you're already using these tools, I think it's better to stick with them as they provide more flexibility and features. However, I find the ESLint approach to be straightforward and the easiest to configure, and it doesn't require an additional dependency.
For more information about the ESLint rule, refer to the official ESLint documentation, or the TypeScript-variant at the TypeScript ESLint documentation. If you're using Biome, see the Biome documentation.
43. Different scenarios require different Entity Framework behaviors
Don't just duplicate the way you query entities in your project, consider tweaking how entities are retrieved for some specific scenarios. Being attentive to how you query entities improves the performance of your application and reduces the load.
Let's go over some differences and compare their results using the Northwind database.
The default behavior retrieves a "full-blown" entity with all its properties, and it's tracked by the Entity Framework context to allow efficient updates.
For read-only scenarios, where you don't intend to update the entities, you can improve the performance by using the AsNoTracking method.
Using AsNoTracking reduces the overhead of the change tracker, for more information see the documentation.
From my experience, this improves the performance of the application by 18.9%.
When querying entities, avoid selecting all columns when it's applicable.
Instead, select only the columns you need and create your Data Transfer Objects (DTO).
This reduces the amount of data transferred between the database and your application, resulting in better performance.
From my experience, this improves the performance of the application by +15.3% (compared to the AsNoTracking solution).
As a bonus, this approach also makes your application more resilient to relational changes as you don't need to manually include child entities using the Include method.
To be complete, the following variations are also possible:
context.Database.SqlQuerydoesn't track changes;context.Customers.FromSqldoes track changes;context.Setdoes track changes;.FromSql
42. Using ngxtension to migrate towards "Modern" Angular
In recent versions, Angular has introduced a new set of APIs and features that are considered "modern" Angular.
The inject method, signal based inputs, and the new output method, immediately come to my mind.
These new APIs are not only more powerful but also more readable and easier to use. That's why it's encouraged to use it in new projects.
But what about existing projects? You can have a mix of old and new Angular code in your project, or you might want to migrate to the new Angular version. I prefer the latter because it keeps things consistent, but in large codebases this can be a daunting task that consumes some time and effort.
To automate this task there's a tool that can help you with this: NG Extension (ngxtension), which is created by Chau Tran and Enea Jahollari. This library provides a collection of utility methods to write Angular code, and it also provides a set of schematics to help you migrate to the new Angular APIs.
Let's see how we can use ngxtension to migrate towards "modern" Angular with some before and after examples.
ngxtension:convert-di-to-inject
ngxtension:convert-signal-inputs
ngxtension:convert-outputs
41. Simplified Dictionary Lookups
When accessing values from a dictionary, it is common to check if the key exists before accessing the value to avoid exceptions when the key does not exist in the dictionary.
This can be done using the ContainsKey method followed by an index identifier.
At first glance, this seems like a good practice. However, by turning on the code analysis rule CA1854 on our codebase, we learned that this isn't the case.
To fix this violation, the rule suggests using the TryGetValue method instead.
This method avoids redundant lookups while accessing values from a dictionary.
And, I also find that using TryGetValue makes the code easier to read.
After this change, which can be auto-fixed, the JetBrains tooling went a step further to simplify this code.
The CanSimplifyDictionaryTryGetValueWithGetValueOrDefault code inspection, refactors this code block into a one-liner using the GetValueOrDefault method (also with an auto-fix).
This is only applicable when a default value is used for values that do not exist in the dictionary.
As a result, we can make our codebases more efficient and concise.
40. An improved content projection experience with fallback content
In Angular 18 you will be able to specify fallback content for ng-content slots. This feature allows you to define default content within ng-content tags, if no content is projected into these slots then the specified default content will be displayed.
In previous versions this was also possible, but included a hacky workaround to make this work. This hack involves using a directive to check if the projected content is empty and then conditionally rendering the default content. This approach is not ideal as it requires additional code that's hard to read and can be error-prone.
39. Take control of query parameterization in EF 9
In Entity Framework 9 we will have more control on how parameters and constants are used within the generated SQL queries.
Using the two new methods EF.Parameter and EF.Constant you can decide on how the query parameters are generated, which is useful when you want to force or prevent query parameterization.
EF.Parameteris used to indicate that the parameter should be used as a parameter in the generated SQL query.EF.Constantis used to indicate that the parameter should be used as an inline constant in the generated SQL query.
This feature makes it easier to manage the query plans that are created, and thus can help to improve the performance of your queries and application.
For more information, see the "What's New in EF Core 9" documentation.
38. Improvements to `dotnet test` in .NET9
So far, the preview versions of .NET 9 have introduced two improvements to the dotnet test command.
- 💅 The output logs will use the new terminal logger by default, resulting in a better experience with more clearly arranged output. The terminal logger was introduced in .NET 8 as an opt-in alternative to the normal console logger. The new behavior uses the new terminal logger by default for environments that support this, and can be disabled using the
--tl:offswitch. For more information and the reasoning for this new behavior see Terminal logger is default - 🏎️ Test projects that hit different Target Frameworks will be run in parallel. This means that you will receive the test results faster. By default the number of parallel processes will be the number of processors on the computer, it can also be configured using the
-maxcpucount:Nswitch.
This results in a better experience for developers and faster feedback loops when running tests.
For more info about Unit Testing .NET 9 see the documentation.
37. Load testing
To measure is to know. As a developer, it's crucial to evaluate your system's capability for building robust and reliable software applications.
Load testing is a key aspect of this evaluation process. It helps you understand how your system performs under varying loads, from real-world loads to anticipated peak load conditions. By subjecting your system to different levels of load, you can identify potential performance bottlenecks, stability issues, and scalability concerns. This information is invaluable for optimizing your system, ensuring it can handle the expected user loads resulting in a positive user experience and preventing system failures under high loads.
Why is Load Testing Important?
- Performance Optimization: Load testing helps identify the (maximum) operating capacity of an application, any bottlenecks or weak points in your system, and determine which element is causing degradation. This can help you optimize the performance of your application.
- Regression Testing: Load testing helps you to identify performance trends in your application. By introducing tests you can ensure that new features or changes do not negatively impact the performance of your application.
- Scalability Planning: Measuring is knowing. You can plan the infrastructure better when you know the number of users your application can handle and act accordingly.
- Improved User Experience: By ensuring that your application can handle expected user loads, you can provide a better user experience. Slow or unresponsive applications can lead to user dissatisfaction.
Why Invest Time in Load Testing?
Investing time in load testing is a preventive measure to ensure system readiness and performance capability. It’s about being proactive rather than reactive. Without proper load testing, your application could fail spectacularly at the worst possible time - when there are maximum users on the system.
In conclusion, load testing is not just a one-time task but a crucial part of the continuous delivery process. It ensures that your application will perform well under pressure, providing a seamless experience for your users, and ultimately, contributing to the success of your software or application.
How to Perform Load Testing?
There are several tools available for load testing, here are a few that I've used in the past:
- Bombardier: a simple CLI tool for load testing a single URL. Useful for quick tests, for example, to test the configured Rate limiting on an API. East to configure.
- Artillery: define test scenarios with various load phases using YAML. Artillery has a built-in Playwright engine. Easy to configure in your CI/CD pipeline.
- K6: write test scripts in JavaScript. It has a (paid) cloud service for running tests at scale. Easy to be added to your CI/CD pipeline. K6 has a useful browser extension to record user flows.
- Apache JMeter: for if you like a GUI to create and execute tests. A battle-tested tool.
36. SQL Temporal Tables
SQL Temporal Tables is a feature that allows you to keep a history of changes to a table without an effort.
By enabling SYSTEM_VERSIONING on a table, SQL Server creates a history table and keeps track of changes to the table.
This is useful for auditing purposes, or for tracking changes to data over time.
Temporal tables (also known as system-versioned temporal tables) are a database feature that brings built-in support for providing information about data stored in the table at any point in time, rather than only the data that is correct at the current moment in time. Because it keeps a full history of data changes, it allows for easy point-in-time analysis.
This is useful for:
- Auditing all data changes and performing data forensics when necessary
- Reconstructing state of the data as of any time in the past
- Recovering from accidental data changes and application errors
- Insights to data trends
For more info see the documentation.
Temporal tables are supported by Entity Framework, as I've mentioned in my blog post Entity framework features I wish I knew earlier.
35. Creating a good-looking Windows Terminal
As a developer, I spend a "lot" of time in the terminal. I use it to run various other commands ranging from navigating to folders, running my environment, executing git commands, ...
I want my terminal to be a place that I enjoy spending time in. I want it to be a place where I can be productive.
With my daily driver, the Windows Terminal, I can make it look good and be productive at the same time. The Windows Terminal is highly customizable, and I make use the following tools to make it look good:
- Powershell: the default shell. The Windows terminal also supports other shells.
- Oh My Posh: Make use of one of the beautiful looking themes that are available (or create your own), and add "Segments" to add more information to your prompt. For example, the current git branch (including changes), the .NET/Node.js version, the current Spotify song, ...
- Nerd Fonts: to make sure that the icons are displayed correctly.
- Terminal-Icons: display icons to known directories and files to make the terminal more visually appealing.
- Predictive Intellisense: to get suggestions for commands => this boosts my productivity.
Some bonus tips:
- You can open multiple tabs and screens in the terminal.
- Use the Quake mode to open the terminal (which has the focus) on top of your screen with a hotkey.
- Via the settings, you can customize the colors (including the background) and shortcuts to your preference.
I hope this helps you to make your terminal a place where you enjoy spending time in. For more tips and tricks you can check out my blog How I've set up my new Windows development environment (2022), or one of Scott Hanselman's blog posts about customizing the Windows Terminal.
34. Rate limiting in ASP.NET
Rate limiting is a technique used to control the number of requests a client can make to a server. It is often used to prevent abuse of an API, e.g. to protect against denial-of-service attacks.
This feature is implemented as a middleware. To enable rate limiting in your application, add the rate limiter to the service collection, and then enable the middleware within the application.
To configure the rate limiter, you can use one of the built-in limiters to create policies, which can be applied to the whole application or to specific endpoints. The built-in limiters are the following (the descriptions are taken from the official documentation):
- Fixed Window Limiter: uses a fixed time window to limit requests. When the time window expires, a new time window starts and the request limit is reset.
- Sliding Window Limiter: similar to the fixed window limiter but adds segments per window. The window slides one segment each segment interval. The segment interval is (window time)/(segments per window).
- Token Bucket Limiter: similar to the sliding window limiter, but rather than adding back the requests taken from the expired segment, a fixed number of tokens are added each replenishment period. The tokens added each segment can't increase the available tokens to a number higher than the token bucket limit.
- Concurrency Limiter: limits the number of concurrent requests. Each request reduces the concurrency limit by one. When a request completes, the limit is increased by one. Unlike the other requests limiters that limit the total number of requests for a specified period, the concurrency limiter limits only the number of concurrent requests and doesn't cap the number of requests in a time period.
See the documentation for more details and example implementations. For more examples I also encourage you to take a look at Maarten Balliauw's blog ASP.NET Core rate limiting middleware in .NET 7.
33. The Methods to Update an Array: Cheat Sheet
ECMAScript 2023 (ES2023 or ES14) introduces a fresh set of array instance methods to enhance the way arrays can be modified.
In total four new methods are added, toSorted() (vs sort()), toReversed() (vs reverse()), toSpliced() (vs splice()), and with (vs bracket notation).
These methods use immutable operations on arrays, making it easier and more predictable to work with data without directly modifying the original array.
If you're use TypeScript, these methods are available in version 5.2.
Let's dive into these new methods, and at the same time refresh our knowledge for the existing methods.
| Description | Mutable Version | Immutable Version |
|---|---|---|
| Sorts the array | sort(compareFn) |
toSorted(compareFn) - NEW |
| Reverses the array | reverse() |
toReversed() - NEW |
| Change an element in the array | bracket notation (.[index] = e1) |
with(index, value) - NEW |
| Changes the contents of the array | splice(start, deleteCount, items?) |
toSpliced(start, deleteCount, items?) - NEW |
| Removes the last element | pop() |
slice(0, -1) |
| Removes the first element | shift() |
slice(1) |
| Adds element(s) to the end of the array | push(e1, e2) |
concat([e1, e2]) |
| Adds element(s) to the start of the array | unshift(e1, e2) |
toSpliced(0, 0, e1, e2) |
| Changes all elements within a range to a static value | fill(value, start, end?) |
❌ Not available |
| Shallow copies part of this array to another location in the same array | copyWithin(target, start, end?) |
❌ Not available |
For additional details, check out the MDN documentation. Besides the new mutable methods, the ES2023 also added the findLast, and findLastIndex methods for an easy lookup of the last element in an array.
A runnable example can be found in the following the TypeScript Playground.
32. Angular DevTools
The Angular DevTools is a browser extension that provides debugging and profiling capabilities for Angular applications. With the DevTools you can explore the component tree and investigate (and edit) the state of your components.
Using the profiler you can visualize the execution of Angular’s change detection and use this to identify performance bottlenecks.
This feature makes it easy to compare the different change detection strategies. The benefits of local change detection, which Rainer Hahnekamp explains in his blog Local Change Detection in Angular, will clearly be visible in the profiler.
31. Snapshot testing in C# with Verify
Why snapshot testing
Snapshot testing is a powerful technique that allows you to compare the output of your code with a previously stored value, also known as a snapshot. This way, you create a quick feedback loop to easily detect any changes or regressions in your code without having to write complex assertions.
I like to write snapshot tests to compare the output of a (large or complex) contract against a pre-defined data model. This is often faster to write and easier to read (also by non-technical people) in comparison to writing a complex assertion with code.
How does it work
Snapshot testing usually stores a previously generated output as a separate file. When the test case is re-executed it compares the new output (local, not included in git) against the stored file (which is included in git). If the new output matches the existing output the test will pass, otherwise the test will fail. When the latter is the case, you can either update the snapshot if the change is desired or investigate the change(s) if the output is unexpected.
Using Verify in C#
For snapshot testing in C# you can use the Verify snapshot tool.
Verify is a simple library that you can use as a standalone tool, or you can use one of its opt-in integrations with popular testing frameworks, such as NUnit, xUnit, and MSTest. A killer feature is that Verify also provides a rich diffing tool (think of a git compare) to help you understand the differences between snapshots, including helpful "accept" and "reject" features to update the snapshots.
To write a snapshot test with Verify use one of the Verify methods within a test to return the model under test.
By default it uses the fully qualified method name of the test case to create the existing output file (*.verified.*) and the newly generated file (*.received.*).
Every time the test case is executed, the received file is re-created and compared with the verified file.
To make the managing of snapshots easier, you can make use of IDE plugins (ReSharper Plugin or Rider Plugin) or the dotnet cli tool.
As an example let's take a look at the following flow using Verify.
30. Simplify Grouping Arrays in JavaScript with Object.groupBy()
Grouping an array of objects in JavaScript no longer needs to be complex. The new Object.groupBy() static method simplifies this task by allowing you to group elements based on string values returned by the callback function.
Previously, achieving this required manual grouping (using methods like reduce) or relying on external libraries like Lodash.
However, with Object.groupBy(), you can achieve the same result in a more readable and concise manner.
Here are the key points:
- 💫 Functionality: group elements based on a specified string (object
keyor custom string). - 💁 Browser Compatibility: available in modern browsers.
- 🛠️ TypeScript Support: included in v5.4-beta.
Input data
To explore and experiment with Object.groupBy(), check out the following TypeScript playground to see the code in action.
29. Entity Framework Include Filters
The location where you filter (included) entities is important, as it has a significant impact on the result set. Without knowing the details, it's easy to make assumptions and make a subtle mistake while filtering entities.
I know I made the mistake numerous times, even not so long ago, and I'm sure I'm not the only one. That's why I decided to write this Bit, to raise awareness about the small but important details.
The following examples illustrate the difference between including filtered entities (using Where), and filtering
entities after the include (using Any in this example) statement.
Input data
The first example retrieves all persons and only includes the addresses matching the ZipCode predicate.
Does not filter the "root" entity.
The second example only retrieves persons that contain the specified ZipCode condition, with all their addresses.
Filters the "root" entity, not the children.
28. Automatically verify that team rules are met using Architectural Tests
Every team has rules and agreements on how to write and structure code. In the best case, these are documented, and yes we all know that developers don't like to read documentation, also every team has its unwritten rules. Some of these rules carry over across teams e.g. best practices, while others do not and are team-specific e.g. a personal preference or some historical reason.
So how do you make sure that everyone including new team members follow the team's style? We already established that it's hard to stick to the rules using a wiki. Pair programming and pull requests do help, but this doesn't scale well. This also leaves room for inconsistencies.
Instead of a human verifying if the rules are followed, we need a way to automate this process. While doing so, the agreed team rules are set in stone and cannot be ignored or misinterpreted.
Teams already rely on automated tests to test the functional requirements (and probably the non-functional requirements) of the application. So why not include test cases to test if your team rules are met?
As a solution, we can resort to Architectural Tests. Architectural Tests are comparable to unit tests and are focused on the architecture as a way to enforce team rules and agreements.
Automating this process gives the same benefits as other tests, it saves time and shortens the feedback loop. And one needs to be the bad guy while (repeatedly) commenting on someone else's code. As a result, this widens the pit of success. The same rules apply to every team member, this greatly improves the consistency within your codebase.
Some good candidates that qualify to write Architectural Tests are:
- Naming rules
- Dependency rules (Namespace and Types)
- Folder/namespace structure rules
- Attribute-based rules
To write architecture tests we use the ArchUnitNET package (a port from the popular ArchUnit package in the Java ecosystem). Using its FluentAPI rules (tests) can be created to assert the structure of a system. When a test fails, it provides a descriptive and clear error message, in which you can also include a reason.
Some practical examples:
While I was writing this Bit I also noticed Milan Jovanović created two videos (How To Create Better .NET Applications with Architecture Tests and How to Write Architecture Tests for the Clean Architecture) on Architectural Tests using a similar library NetArchTest. Both libraries serve the same purpose, and have a similar Fluent API, but are different in some small details e.g. in the way they assert the rules.
A little side note, there isn't a lot of documentation about both of these libraries and this will require some trial and error while writing your first architectural tests, at least this was the case for myself.
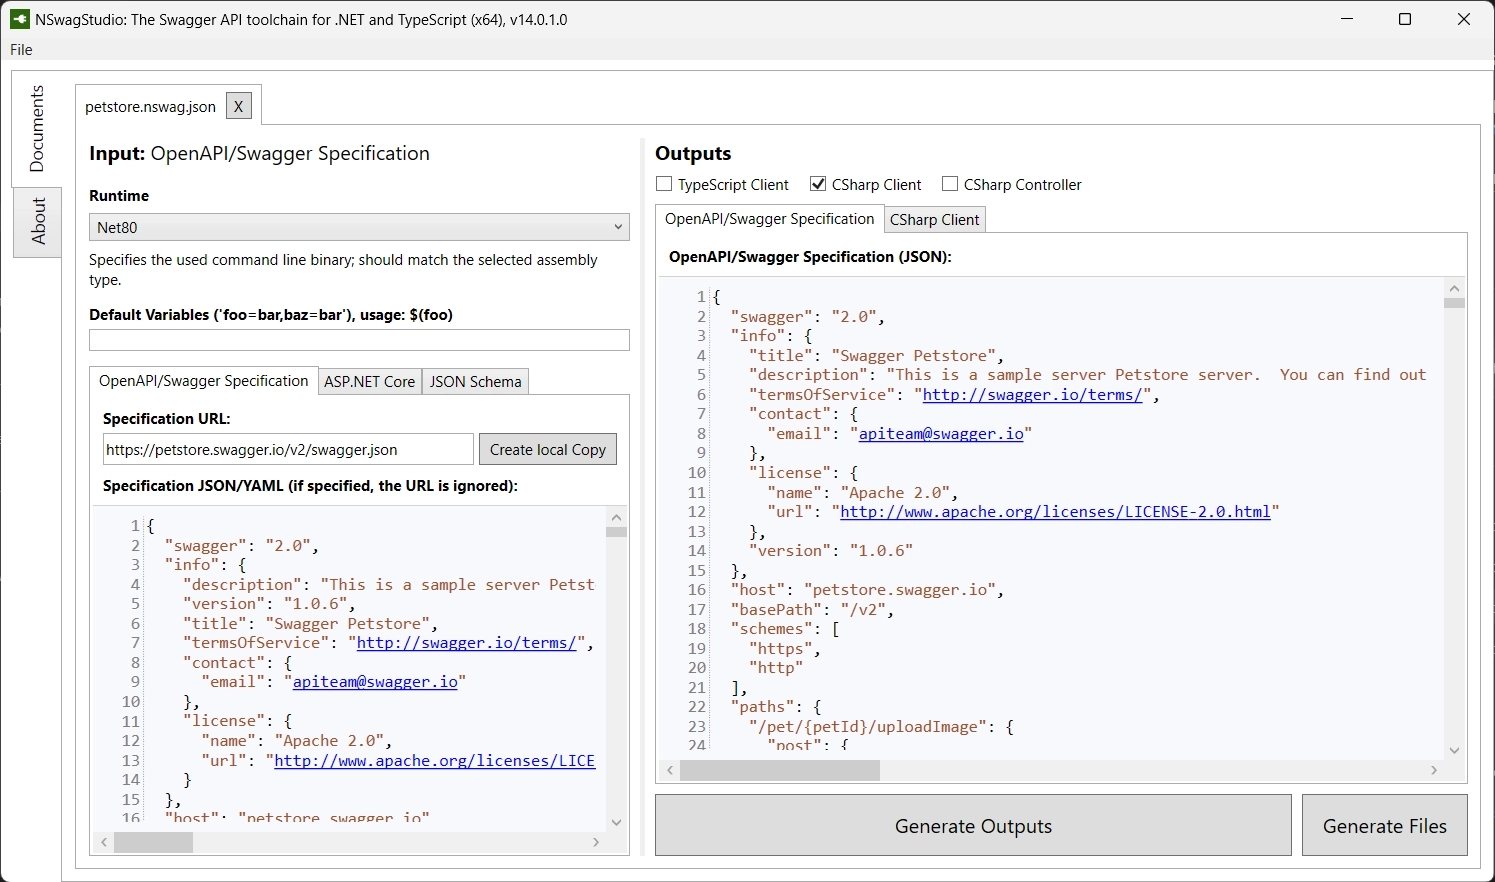
27. Generate code with NSwag using the OpenAPI Specification
It appears that the popular Swashbuckle.AspNetCore project isn't being actively maintained anymore, and doesn't support .NET 8. NSwag provides a good and battle-tested alternative, to get started see the Microsoft Guide.
I was always skeptical about code generation tools using the OpenAPI specification. But recently, I decided to give it another go, and surprisingly it was a positive experience!
My use case was an integration with a 3rd party, instead of writing all the DTO models and endpoints manually I resorted to NSwag to generate an HTTP client (including all of its dependencies) for me. You can also use this for code that you own.
NSwag provides different methods for generating code, ranging from a manual operation to an automated way. Besides C# HTTP Clients, it also supports the generation of C# Models/Controllers, as well as TypeScript clients for most front-end technologies, e.g. Angular.
- NSwagStudio: a Windows Desktop application to import an OpenAPI specification, and configure the parameters to generate the output file. Based on the configuration you can generate a client and/or save the configuration to an NSwag configuration document (
*.nswag.json), which can be used later again with the intent to regenerate the client.
- A CommandLine Tool with commands to generate code based on an NSwag configuration document (which is created with NSwagStudio)
- NSwag.MSBuild to incorporate the generation process during a build (this also uses the NSwag config file)
- NSwag.CodeGeneration.CSharp, a NuGet package to generate code using C#. There's also a TypeScript equivalent NSwag.CodeGeneration.TypeScript to generate TypeScript code.
All of these gives you a working C# HTTP Client, including the needed models, interfaces, ... as output.
There's also the .NET Core Global Tool Microsoft.dotnet-openapi to generate HTTP clients using the OpenAPI specification.
Internally it uses NSwag for the generation.
From my limited experience with it, it isn't as versatile as the toolkit that NSwag provides, NSwag is also better documented.
But, dotnet openapi definitely something to keep an eye out for in the future.
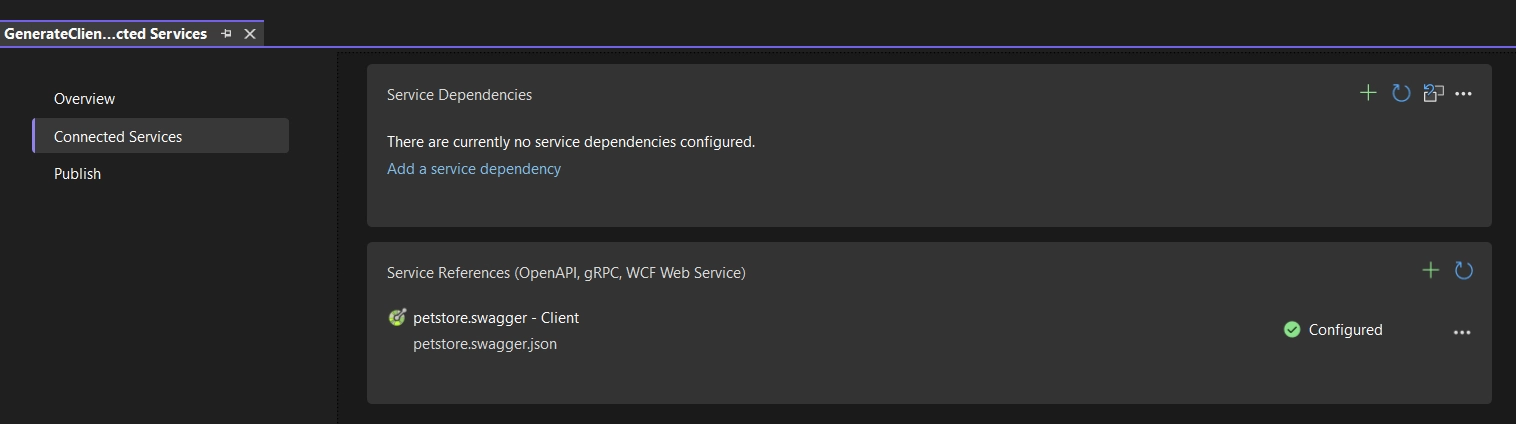
The add will also create an OpenApiReference within the project, which is +/- the same as adding an OpenAPI specification via Visual Studio.
Because of this, it can also be interpreted by Visual Studio, and the generated client can be viewed and refreshed via the UI.
26. Use Zod to parse Unknown Data
How many times was there an issue within your application because you trusted data that you don't control (e.g. incoming data), or worse, how many times did the application entirely crash because of it? Thinking back, was this easy to detect and could it have been prevented?
Instead of trusting the data that you don't own, it's better to guard yourself against unexpected cases. Using zod it becomes an easy task to detect unexpected data structures and act accordingly.
Zod is a TypeScript-first schema declaration and validation library. I'm using the term "schema" to broadly refer to any data type, from a simple string to a complex nested object.
Zod is designed to be as developer-friendly as possible. The goal is to eliminate duplicative type declarations. With Zod, you declare a validator once and Zod will automatically infer the static TypeScript type. It's easy to compose simpler types into complex data structures.
Because an example says more than words, let's revise and refactor an example from my latest blog post Multiple releases using the same, but configurable, Angular Standalone Application build. In the blog post, the environment configuration is defined as a JSON structure and is assigned to an instance at run-time. This can go horribly wrong when the interface and the JSON model aren't in sync anymore, e.g. after updating the model but not the JSON file.
Before the application is bootstrapped, the config is parsed and when the apiUrl isn't present in config file (or is empty), the following error is thrown in a clean and concise format that contains all the necessary information.
Using this example, we see the benefits that Zod brings to a team:
- Eliminates Duplicative Type Declarations: With Zod, you declare a schema once and Zod can infer the static TypeScript type.
- Ensures Data Consistency: Zod helps ensure that the data your team works with is consistent and adheres to the defined schema.
- Enhances Developer Experience: using Zod simplifies the process of validating and parsing data, instead of introducing a big blob of messy code to validate objects, Zod streamlines and unifies this process making development easier and more efficient.
Other scenarios where Zod is useful involve other parts in a codebase that interacts with the "outside world", such as HTTP responses, URL parameters, CLI input, and it can even be useful for form validation.
As you can see, it's usually data that the application receives, or in other words data that you don't control, that needs to be parsed before it can be safely accessed/used.
While Zod is small in size (8kb minified + zipped), the only caveat is that it cannot be threeshaken. If that's a requirement there are a couple of alternatives inspired by Zod, e.g. Valibot.
If you're interested, take a look at the Zod articles on my blog. Here you will see more use cases, such as generating test data using zod-fixture.
25. New in Entity Framework 8: Primitive collection properties
Starting from EF 8, EF automatically stores a collection of primitive values directly in a column (as JSON), whereas previously a separate table was required.
To query data, the OPENJSON table-valued function is used. This creates a rowset view of the JSON data, which can be compared as a "normal" relational table, and can thus be queried as you're used to.
OPENJSON is more and more used in EF features to support more use-cases (or to improve the query performance). An example of this is the possibility to use inline collections while querying data, as mentioned in the release announcement.
A use case for using primitive collection properties is to save a data collection that's retrieved via its parent. If you need to query this set, it's probably better to store the collection in a seperate table. This allows you to create indecies in order to optimize search-based scenarios, that otherwise isn't possible using a JSON column.
Let's explore how this translates into code and SQL.
For more info and new features introced in EF 8 see the documentation.
24. Improve your development tasks with Windows Dev Drive
If you know me, you know that I like to fully optimize my workflow, and a Dev Drive helps to improve it.
A Dev Drive is a virtual drive (using the ReFS technology) that speeds up file-related tasks. This makes it ideal for many daily development related jobs such as building applications, installing packages, running test suites, and so on.
I find that this is the ideal time of the year to make changes before hitting the ground again because you'll benefit from this for the rest of the upcoming year. That's why I recommend you to take a look at a Dev Drive, since it just takes a moment to set up a Dev Drive on Windows.
Here's a comparison after migrating my projects and cache locations (for NuGet and npm) to a Dev Drive. As you can notice, all of the commands that I use frequently have improved by 20% to 25%.
| Command | Time - NTFS | Time - Dev Drive | Improvement |
|---|---|---|---|
| dotnet build (cold) | 9.362ms | 7.195ms | 23.1% |
| dotnet build (hot) | 23.11ms | 1.856ms | 19.7% |
| ng build | 23.803ms | 17.648ms | 25.9% |
| npm ci | 56.951ms | 43.387ms | 23.8% |
Check it out and see the difference for yourself!
The performance improvements from my experience matches with the numbers that are shared in the Dev Drive: Performance, Security and Control for Developers article.
I also found Maarten Balliauw's blog Test-Driving Windows 11 Dev Drive for .NET helpful and easy to follow, it also contains useful scripts to automate the migration.
For more Windows tips and tricks to improve your development workflow, see How I've set up my new Windows development environment in 2022.
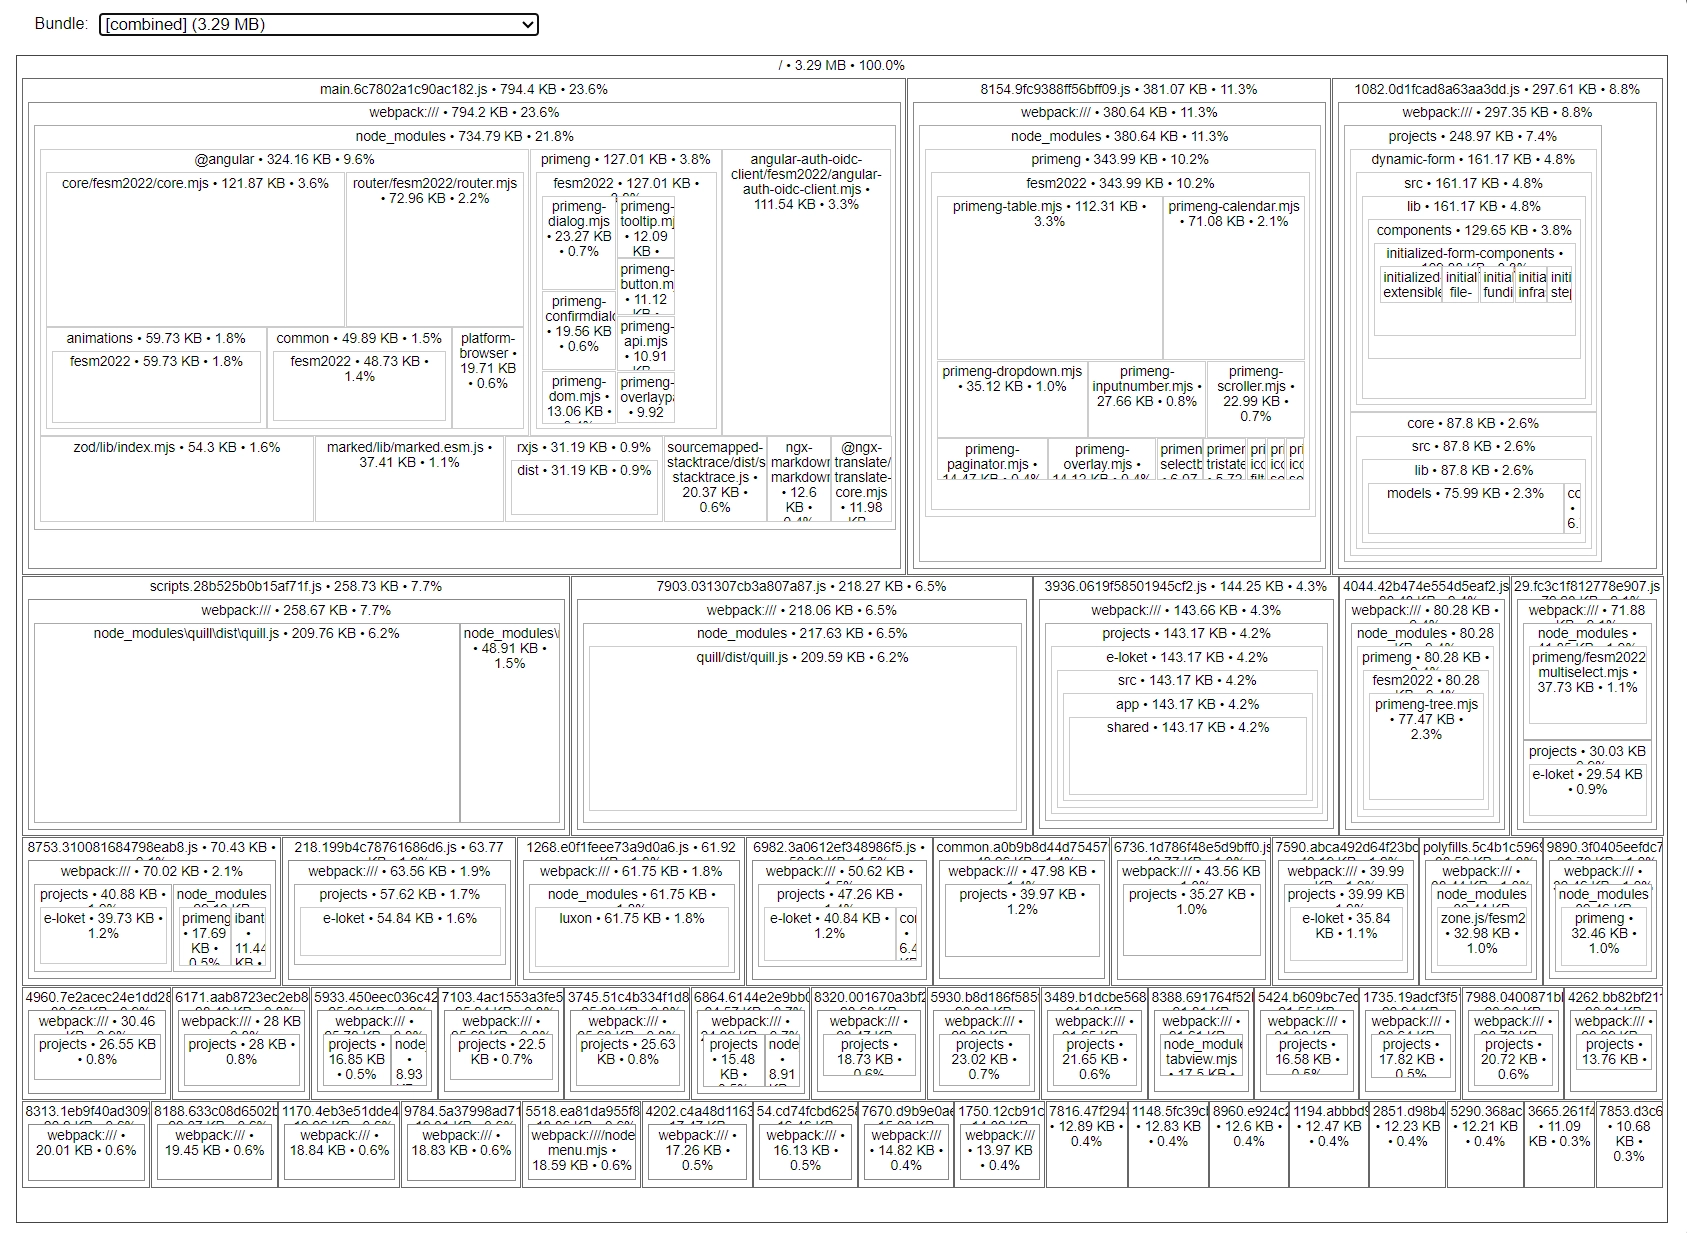
23. Optimize your bundle size with source-map-explorer
Recently I was able to reduce the initial load of our Angular application from 2.8MB to 750kb (a 75% reduction!) in just a few minutes.
Using source-map-explorer I was able to detect eagerly loaded modules that should've been lazy loaded, and dependencies that could be moved or removed.
If you want to optimize your bundle size, run the following command (replace PROJECT-NAME) and analyze the main.js file to start your investigation.
This command should open a new browser window with the output details in which you can see all the included dependencies (from your own or 3rd parties).
Make sure that you've built your project with source-maps enabled.
If that's not the case, either update your source map configation, or pass the --source-map option flag to the Angular build command.
For the next step, explore the remaining files and be attentive to what can be trimmed down.
22. Simpler code with Using Declarations
The using declaration is a feature (introduced in C# 8.0) that allows you to declare a disposable object with the using keyword.
The lifetime of a using local will extend to the end of the scope in which it is declared. The using locals will then be disposed in the reverse order in which they are declared.
I prefer this syntax compared to the "older" using statements because it's easier to read and follow. You no longer have to create scope blocks with curly brackets (and the accompanying indentation(s)) to dispose objects.
21. 👋 Hello @ngrx/signals
Exciting news for Angular developers!
With the release of Angular Signals, the NgRx team - especially Marko Stanimirović who came up with the idea and did the heavy lifting - built a new state management solution that provides a reactive state management solution and a set of utilities for Angular Signals.
@ngrx/signals consists of two big blocks and includes multiple smaller convenient Lego blocks to make working with state simple and intuitive.
- The
signalStateutility method provides a lightweight solution that manages state in a concise and minimalistic manner; - While
signalStoreprovides a full-blown state management solution (with optional plugins, e.g. Entity Management);
These tools provide an opinionated, but flexible, development experience to build your application.
Check out the v17 blog post for more info, or the in-depth blog posts from the Angular Architects team!
20. Use jq to query and manipulate JSON data
jq is a lightweight command-line tool to quickly process your JSON data.
I mainly use it to search (grep) and select specific fields of a JSON file, but it can also be used to transform (sed) and process (awk) the data.
Of course, the output is also nicely formatted.
If this peaks your interest head over to the download page.
While these examples are simple and are using a local data source, you can feed data to jq using the pipe (|) operator.
Make sure to check out the tutorial and the playground to also learn how to fully take advantage of jq by transforming and filtering JSON data.
19. NuGet Central Package Management
When you've worked in a mono-repository that contains multiple C# projects, you've probably felt the pain of maintaining NuGet dependencies. Updating packages to a newer version, keeping versions in sync across different projects, removing outdated dependencies, ...
With Central Package Management (CPM) this daunting task becomes easier to manage.
By creating a file Directory.Packages.props within the root of the project, all NuGet package references can be defined with their corresponding version.
Next, the version of the package references that are defined within the project (.csproj) files can be removed.
The result is a file that contains the single source of truth when it comes to your package versions.
You can still override versions for one-off cases, or subdivide this file into multiple files. For more info about CPM, see the documentation.
18. Pretty TypeScript types
I learned this trick from Matt Pocock, and I've seen the power by seeing Marko Stanimirović using it in the NgRx codebase. Because I think that we'll see more usage of this, I wanted to make a bit out of it.
You've probably already encountered TypeScript types where you scratch your head and think "What does this even mean?". From my own experience, this can happen when you interact with complex types from 3rd party packages.
Using the following Prettify utility type, which you need to create yourself, some of the types will become more readable.
Prettify takes a generic parameter T and maps over its keys using a mapped type to essentially create a new type that has the same properties as T.
Here's a breakdown of what's happening:
type Prettify: This is a declaration of a new type calledPrettifythat takes a generic parameterT.Tis a placeholder for any type that you want to use withPrettify.[K in keyof T]: This is a mapped type. It iterates over all keys ofT(represented byK).keyof Tis a type that represents all keys ofT.T[K]: This is an indexed access type. It represents the type of propertyKinT.& {}: This is an intersection type. It combines multiple types into one. In this case, it's intersecting the mapped type with an empty object type. However, since an intersection with an empty object doesn't change the type, this part doesn't have any effect on thePrettifytype.
The unwrapping of object properties turns resolved types that were previously difficult to comprehend, into types that become easier to read and understand.
Let's take a look at an example to make this clear:
With a small modification, it can also unwrap child properties.
For more info see Matt's blog The Prettify Helper.
17. Edit and send HTTP requests directly from the Browser DevTools
Did you know you can use the browser DevTools (in Microsoft Edge and Firefox) to edit and send network requests?
This little trick can save you some time. Instead of manually reproducing a request, or copying the request via the network tab, you can right-click a network request to edit the URL, headers, body, etc, and resend the edited request! 🚀
16. How are the TypeScript Partial and Required types implemented?
I find it important to know how the most-used TypeScript utility types are implemented.
Here, we see the implementation of the Partial (all properties of a type are optional) and Required (all properties of a type are required) types.
Knowing this is essential because it allows you to customize or create a new behavior for your use cases.
keyof Persongenerates a union of the keys of Person, sokeyof Personresults in"id" | "name".[key in keyof Person]iterates over each key in that union.Person[key]is the type of the property in Person associated with the key, so "id" is a number, and "name" is a string.- The
?modifier makes the property optional (used for thePartialtype), while the-?modifier removes the optional modifier from the property, making it required (used for theRequiredtype).
15. Bulk updates in Entity Framework
Use bulk updates to update entities with a single command (without the need of the change tracker).
The entities will not be loaded into memory, which results in more efficient updates and deletes.
For more info, see my blog post "New in Entity Framework 7: Bulk Operations with ExecuteDelete and ExecuteUpdate", or the documentation.
14. How to quickly open a GitHub repository within an IDE
As developers, we read more code than we write.
We don't only read our own code that we wrote ourselves, or the code from our project, but we also come in contact with code from 3rd parties.
Personally, I like to browse through code to learn or to investigate a behavior or problem that I encountered. While doing so it's useful to be in a comfort zone where you already know how to navigate within the code base to find the thing that you're looking for.
The GitHub interface has improved in the last couple of years, but it isn't the same as using an IDE. An IDE has the advantage that it's smarter. It can, for example, show all the references, go to the implementation with a simple click, and more.
To have that familiar IDE experience without having to clone or download the repository locally, which can be time-consuming especially if you don't have all the dependencies installed, there are a few options.
Here are the ones that I like to use, to quickly open a codebase within a web-editor to have that familiar IDE experience. As a side note: all of them are powered by Visual Studio Code.
- use https://github.dev/USERNAME/REPOSITORY_NAME (or simply press the
.key in a repository, or in a Pull Request) to open up a lightweight Visual Studio Code in the browser. This is useful to navigate and edit code, but you won't be able to execute scripts/commands. - use https://stackblitz.com/github/USERNAME/REPOSITORY_NAME to open the codebase within StackBlitz. Useful to play with some code or to quickly test something out. Focused on Node.js environments. StackBlitz also has a specific Pull Request explorer via pr.new.
- use https://codesandbox.io/s/github/USERNAME/REPOSITORY_NAME (or append
boxto the github url => https://githubbox.com/USERNAME/REPOSITORY_NAME) to open the codebase within CodeSandbox. Similar to StackBlitz but supports more languages. Codesandbox also has a GitHub Action to quickly review a Pull Request. - use GitHub Codespaces to create a dev environment, it's also possible to open this environment locally in your favorite IDE. Codespaces can do everything that you can do locally.
13. New in C# 12: Collection expressions
Creating collections becomes simpler in C# 12 using collection expressions.
We can also make use of the spread operator .. to copy the values from a collection.
More info can be found in the documentation.
12. Polyglot Notebooks
As developers, we sometimes need an isolated environment or a testing sandbox. For example, to reproduce a problem, or to share a snippet with a team member.
This is already possible using online REPLs e.g. TypeScript playground and .NET fiddle, or we can resort to web containers for example GitHub Codespaces or Stackblitz.
The problem that I encounter with these tools is that I often forget or lose previously created proof of concepts, or that it's hard to share them with my team.
That's not the case with Polyglot Notebooks.
Using notebooks has the following benefits:
- testing, creating an isolated sandbox to test something out
- easy to share, can be committed to git
- enhances collaboration, can be used by all team members
- integration, can be integrated within your environment, e.g. connect to a database
Some use cases where notebooks can be useful:
- can serve as an interactive documentation tool
- can include runnable snippets to automate tasks
- teaching/onboarding interactivity makes it more fun
- an offline REPL alternative
Get the Polyglot Notebooks Visual Studio Code extension in the marketplace.
11. Angular Control Flow
The past week I cursed Angular a little bit because I just wanted to have a simple if-else condition within my HTML template.
But, as you probably already know, we have to jump through a couple of hoops to get this working.
The result is a not-so-easy-to-read template that's prone to errors.
Angular 17 changes that by providing a new (opt-in) way on how we write our templates.
Instead of using the structural directives NgIf, NgFor, and NgSwitch, you'll be able to use the new @ syntax.
This change drastically improves the Developer's Experience;
- it's easier to read
- you don't have to import the directives
- it's less verbose since you don't have to create wrapper components e.g.
ng-container.
As an example, let's take a look at my if-else condition and compare both solutions.
For completeness let's also take a look at the new syntaxes to iterate over a collection (*ngFor) and how to create a switch expression (*ngSwitch).
To already try out the new Control Flow feature before it's officialy released, update the angular compiler options within the TypeScript configuration file.
Add the _enabledBlockTypes property, and add the blocks you want to use within your application.
For more information see the Angular blog post Meet Angular’s New Control Flow.
10. Cypress to Playwright converters
Migrating from one test library to another can be a daunting task, but with the right tools, we can make it a smoother transition.
To help with this task I've encountered two similar tools that rewrite your Cypress code to its equivalent in Playwright.
The first of these tools is https://demo.playwright.dev/cy2pw/, and the second one https://ray.run/tools/cypress-to-playwright (you should also check out the blog on this website for more goodies!).
On the websites, you can simply paste your Cypress code, and you'll receive the test cases rewritten in Playwright ✨. Just like that.
These tools can be used for a couple of reasons:
- trying out Playwright without wasting time
- quickly see what the Playwright equivalent is of a code block
- rewrite a specific piece of code (think of a test that you aren't able to write properly, or don't know where to start), or even rewrite entire files
- motivate your team to try/use Playwright
- hit the ground running from day one
In short, the mentioned tools help you with the transition from Cypress to Playwright.
Side note: if you have a GitHub Copilot license you can also prompt your Copilot to migrate a test or file for you. In a small demo application, this worked out fine for me.
Here's a small example to give you an idea of a migration:
For more Playwright content, check out my blog posts about 🎭 Playwright.
9. Switch Exhaustiveness
How many times have you added a new option (enum, union, expression, ...) without updating all code paths? Did this result in unforeseen issues?
One of the reasons why I prefer switch statements over if-else conditions is that it supports exhaustiveness checks. This is incredibly useful because it ensures that no scenario is left unhandled, reducing the risk of unexpected bugs or runtime errors. It also shortens the feedback loop because your IDE immediately flags incomplete switch statements.
Personally, I also find a switch statement more readable in contrast to an if-else condition.
The Switch Exhaustiveness check is not enabled by default, so you'll have to enable it.
In C# applications the default behavior is that a non-exhaustive switch is a warning.
To turn this into an error, configure the TreatWarningsAsErrors compiler option in your project(s).
If you just want to treat specific warnings as an error, use the WarningAsErrors compiler option instead, which accepts warning numbers, e.g.
Now, when a switch is not exhaustive, it results in a compilation error.
For TypeScript applications, enable the switch-exhaustiveness-check ESLint rule.
It's best to configure this rule as an error so it catches your attention.
Enabling the ESLint rule doesn't prevent the application from building. As an alternative, manually add a default case that turns into a compiler error when it detects a non-exhaustive switch. For this, you can use the never type. Now this will also result in a compiler error.
8. The Evolution of C# Constructors
C# 12 introduces a new syntax to declare class constructors with Primary Constructors. That's why I thought that it's a good time to look back at the evolution of C# constructors. Starting from the most basic constructor that most of us are familiar with, to the newer variations that were added in latest the C# versions.
7. Simplified Node.js Version Management with fnm
Are you working on multiple projects that each require a different Node.js version, and are you tired of juggling between them? Then I've got the right tool for you, fnm (Fast Node Manager).
fnm is a Node.js version manager that allows you to install and switch between different Node.js versions on the fly.
What I especially like about fnm, compared to similar version managers, is that it provides a seamless experience by automatically switching to the correct version when it detects a .node-version (or .nvm) file in your project's directory.
For example, let's say you have two projects, awesome-project and great-project, and each of them requires a different Node.js version:
In the preceding example, fnm automatically switched to the correct Node.js version for each project.
Because awesome-project requires a Node.js version that isn't installed yet, we received a prompt asking if we want to install it.
To set the Node.js version for a project, create a .node-version file in your project's directory and add the version number to it:
Other helpful fnm commands are install, use, default, and current:
Bonus: GitHub Codespaces is great to use for switching between multiple project configurations that require bigger changes, when you just need a clean environment to work in, or to quickly test something out. You can easily create a new Codespace while working (or using an existing Codespace for reviewing) for changes that have a big impact on your environment, e.g. an upgrade of an SDK, such as .NET, Node.js, ...
6. Git Log Heatmap
Use git log to create a heatmap of the files that have been changed the most frequently within a repository.
This is useful to identify the files that most likely need a closer look.
For example, the file contains too much logic and should be split up into multiple files, it contains hot code paths that change frequently, or maybe it's a file with a history of many fixes.
The following git log command returns a list of files (excluding json and lock files) that have been changed within the last 6 months, sorted by the number of changes.
5. Raw SQL Queries for Unmapped Types in Entity Framework 8
Entity Framework 8 has a new feature that allows you to execute raw SQL queries against the database and return results as unmapped types.
To use this feature, use the new SqlQuery method on the Database property of your DbContext instance.
This feature is useful when you want your query to return a specific type for a specific purpose. For example, in many cases you don't need/want the overhead of returning your full-blown entity for search queries. Instead, you want a optimized entity (e.g. a DTO) that only contains the data you need for that specific purpose. Usually this results in a faster query and less data transferred over the wire.
See my blog post You can now return unmapped types from raw SQL select statements with Entity Framework 8 for more info about this new feature.
4. Big List of Naughty Strings
Does your application correctly handle all kinds of input correctly? Do you need some inspiration to test your application with some edge/special cases?
Look no further, the Big List of Naughty Strings is here to help you! There are different sets of inputs, from the boring "Reserved Strings" and "Special Characters" cases to the more interesting variants like "(Server and Client) Injections", "Unicode fonts", "Known CVEs and Vulnerabilities", "Special Filenames", and more.
Take a look at the repository and start copy-pasting some of the strings in your application, or use one of the libraries (e.g. NaughtyStrings for .NET, or blns for Node.js ) to automate this process.
Fun fact: I couldn't generate the banner for this bit (in various tools) because it contained a few naughty strings that broke the export.
For the entire set see big-list-of-naughty-strings/blns.txt, here's a small sample:
3. Http Files
.http files are a simple way to quickly invoke your API endpoints because you don't have to leave your IDE to use a separate tool.
I use it regularly when I'm building a new feature.
You can commit this file to your repository so that your teammates can also make use of it!
HTTP files are supported by most IDEs (for Visual Studio Code, you'll have to install the REST Client extensions), the only caveat is that the variables syntax is (currently) different between Visual Studio products and JetBrains products.
Here's an example of a .http file for a Todo API:
For more information, check out the documentation for the various IDEs:
2. Angular Input enhancements
The Angular 16 release adds useful enhancements to the @Input decorator.
We can make an input required, we can transform the input value, and we can bind inputs route data (parameters, query parameters, and the route data property).
We can transform the input value by providing a transform method, which is invoked with the input value.
Angular already provides the numberAttribute and booleanAttribute transform methods, but you can also implement your own.
To be able to bind the route data to component inputs, you need to configure the Angular router by including the new withComponentInputBinding().
1. Tools to keep your NPM dependencies up-to-date
You can use the default npm commands npm outdated (check the registry to see if any packages are currently outdated) and npm update (update all the packages listed to the latest version, respecting the semver constraints of both your package and its dependencies).
But, to get a more detailed and prettier overview of the dependencies, you resort to the CLI tool 🥦 taze, which also works for monorepos.
The Visual Studio Code users among us can install the NPM extension to get a nice sidebar with the package information (and quick actions to update them). Just take a little glance at the sidebar to see if there are any updates available.