Feature Flags in .NET, from simple to more advanced


Before we get to the actual content of this post, let's first talk about the concept of feature flags. A feature flag is a way to enable or disable a feature, or code path within an application.
Ideally, "the switch" when you turn a feature on or off shouldn't have an effect on the code, nor should it require a new release of the code. It's just a toggle that you can flip on or off via some kind of configuration.
This can come in various forms:
- a condition based on the environment, to enable a feature during Q&A, while disabling it in production until it's ready for production;
- a feature that needs to be rolled out to a specific user, or user group, e.g. to testers;
- a time-based feature that needs to be rolled out in the future, or for a certain amount of time, for example, to show a banner;
- let the client decide if the feature is enabled or not, based on the user's preferences;
What I like about feature flags in the .NET ecosystem, is that you can start out simple and then add more to it when you need it. As you see later on in this blog post, the most useful feature flags are already implemented and you just have to plug them in.
Now, let's implement a naive feature flag in .NET and extend it to end up with a more robust solution.
Setting the stage
To follow along with me, create a new application with the following commands.
Next, open the application in your IDE and open the Program.cs file.
Here you'll find code that already implements a GET endpoint to retrieve a collection of weather forecasts.
A trimmed-down version of the code, with only the essentials (the swagger implementation is removed), looks like this.
To verify that the current setup works, run the application and navigate to https://localhost:{portnumber}/weatherforecast (don't forget to update the port number).
If everything went well, you should see a collection of forecasts. For me, this gives me the following result.
Implementing a basic feature flag
With everything ready, we can start to implement a feature flag in the weather forecasts endpoint.
To keep things simple, let's say that the endpoint is enabled or disabled based on the flag.
The most basic feature flag is a simple if statement based on a boolean condition.
To implement the feature flag, define a forecastEnabled variable.
This variable's value decides the return value of the endpoint, when:
true(feature flag is enabled), the endpoint returns the forecast data;false(feature flag is disabled), the endpoint returns a not found (404) status code;
Configurable feature flag
So far, this doesn't really make sense.
The feature flag is either enabled or disabled for all of the clients.
To enable the forecasts endpoint, the forecastEnabled variable needs to be changed in code, and the application needs to be re-released.
Having to do this defeats the reasons why feature flags are useful. The first step that needs to be taken to make this feature flag useful, is to find a way to dynamically change its value.
To achieve this, the feature's condition needs to be defined outside of the application code. As the result, it allows us to change the setting during a release, and thus can the build artifact can be reused in multiple stages of the CI/CD pipeline.
An example: the feature flag can be enabled for a staging environment, while it can be disabled for a production environment.
A way to configure the feature flag conditions is to use the appsettings.
Therefore, we add an extra section FeatureFlags, within the section we also create the WeatherForecast property.
To use the newly introduced configuration, replace the forecastEnabled variable with the value from the appsettings.
Introducing standards with the Feature Management package
Instead of defining our own standards, we can also use Microsoft's implementation from the Microsoft.FeatureManagement.AspNetCore NuGet package.
To install the package, run the following command.
After the package is installed, we can refactor our custom implementation with the generic implementation. To do this:
- import the
Microsoft.FeatureManagementnamespace; - register the
AddFeatureManagementservice; - inject the
IFeatureManagerinto the endpoint; - use the
IFeatureManager.IsEnabledAsyncmethod to check if the feature is enabled;
ASP.NET v7 introduced an EndpointFilter that can be used with Minimal API's.
This is useful because you can easily reuse filter logic, and you don't bloated your endpoint with this logic (in this case, verifying if a feature is enabled).
To create a reusable endpoint filter for your feature flags, you can take a look at my blog post Implementing a Feature Flag based Endpoint Filter
The configuration within the appsettings.json file doesn't need to be changed and can be reused as-is.
This step doesn't seem to be a big change, but it gives us the opportunity to do more...
Built-in filters
Besides a defined and consistent way to configure the feature flags, the package also provides a couple feature flag implementations (filters) for the most common scenarios.
With the Feature Management package, we can enable or disable a feature flag (true or false), just like before.
But the package also has a "filters" concept. With filters, a feature flag can be on or off based on certain conditions.
Each filter has its configuration schema (in JSON), but the way we verify that the feature is enabled remains the same for all filters.
In addition to the built-in filters, you can also write your own custom implementations.
The following filters are available:
PercentageFilter, to randomly enable/disable the feature based on a percentage;TimeWindowFilter, to enable the feature during a predefined window with a start and end time;TargetingFilter, to enable the feature for a specific user, or group of users (for this filter, a percentage can also be set);
For more info about these, you can take a look at the docs.
As far as I know, the TargetingFilter filter cannot be used when the Minimal API structure is used. When you register the filter, you'll receive the error: System.InvalidOperationException: Unable to resolve service for type 'Microsoft.FeatureManagement.FeatureFilters.ITargetingContextAccessor' while attempting to activate 'Microsoft.FeatureManagement.FeatureFilters.TargetingFilter'.
These filters are available from the Microsoft.FeatureManagement.FeatureFilters namespace and must be registered individually.
The rest of the code remains the same. In other words, this doesn't change how we verify that the feature flag is enabled.
As said before, while the way we consume the feature flags remains the same, the way we configure them is different.
As you can see below, the type of filter is appointed with the Name property.
With the Parameters property, the configuration of the filter is set for the percentage and the time window filters.
An example configuration for the targeting filter is shown below.
Instead of the Parameters property, the filter is configured with the Audience property.
Writing a Custom Filter Implementation
To implement your own filter logic, create a class that implements the IFeatureFilter interface and register the service.
The IFeatureFilter interface lets you implement the EvaluateAsync method.
Here, you must write your own logic to determine if the feature is enabled or not.
The method receives the FeatureFilterEvaluationContext argument, which contains the configuration object.
To have access to the filter's parameters, use the FeatureFilterEvaluationContext.Parameters.Get method.
Via the FilterAlias attribute, the name of the filter is set.
This is the same name that needs to be used within the configuration to couple the configuration to the filter.
Using Parameters within Custom Filters
A filter can also receive parameters that are only known at runtime.
This could, for example, be an alternative to the TargetingFilter filter for minimal Apis, because it could receive the HTTP context or subset from it.
To create filters with parameters, replace the IFeatureFilter with the IContextualFeatureFilter interface.
After this change, the EvaluateAsync method receives the additional parameters.
In the example below, a header is read and passed to the filter, but this could also be the HttpContext, a ClaimsPrinciple, or something else.
FeatureGate for MVC Controllers
This part is only available if your application is built by using controllers, and not with the Minimal Api structure.
Instead of checking if a feature is enabled within the code, you can use the FeatureGate attribute to disable a whole controller or a specific endpoint. The parameter passed to the attribute is the name of the feature that's set in the configuration.
Azure Feature Management
So far, so good, but we can do better.
The current implementation has one drawback. When the configuration is changed the application needs to be restarted to have an effect. This has an impact on the users.
If you want to modify a feature flag without restarting the application, you can use the Feature Management feature from Azure. This allows us to dynamically change the configuration of the feature flags.
Read the docs on how to install and manage the feature flags in Azure (pricing table).
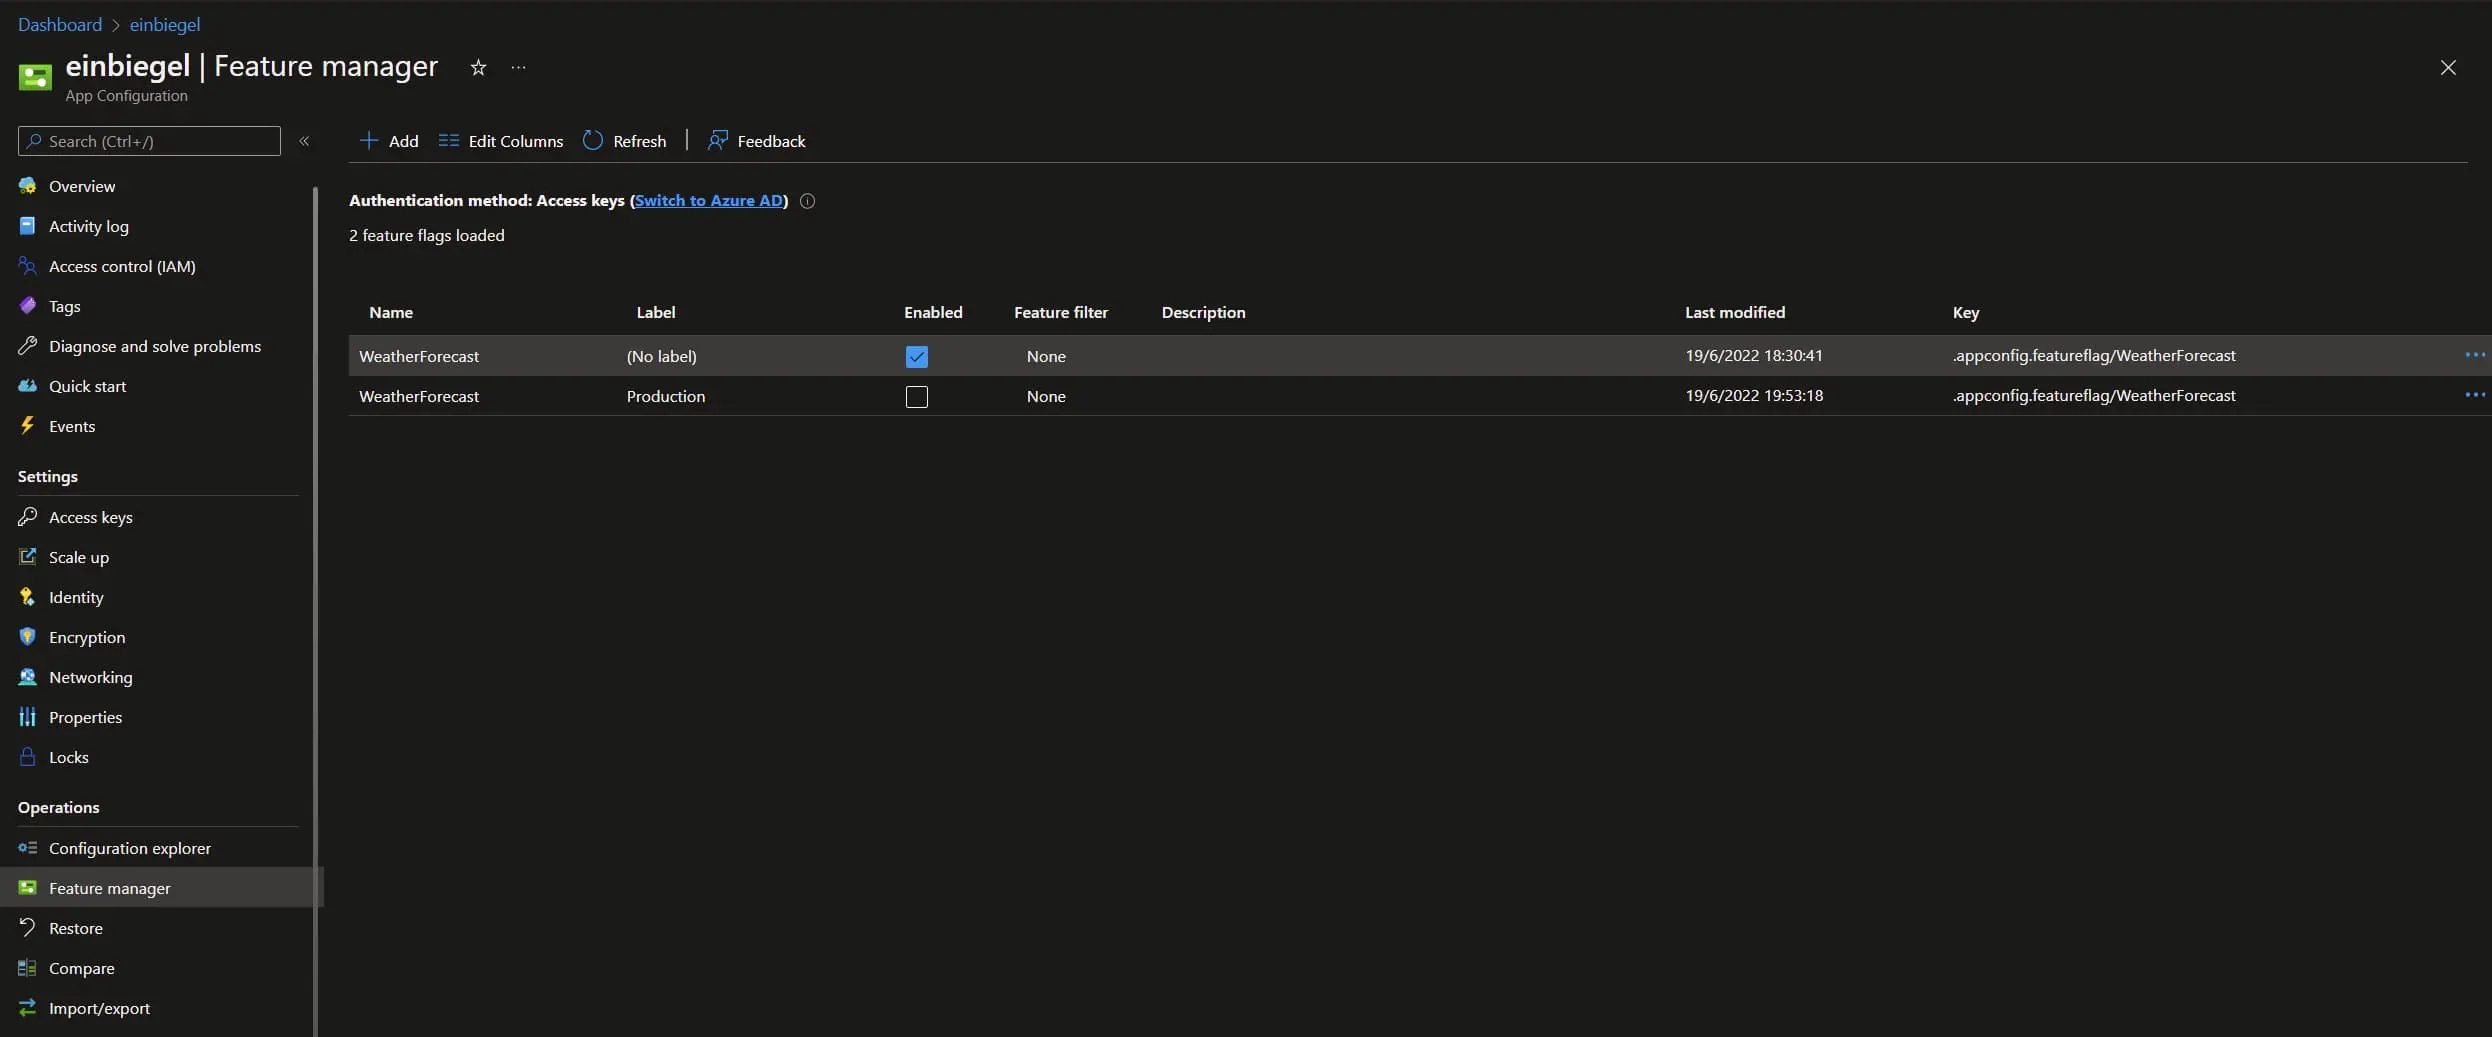
In the Azure Portal, you can create and remove feature flag definitions, and configure their filters.
This is similar to what we had in the appsettings.json file, but it now has a user interface.
As an example, see the following screenshot that defines the WeatherForecast feature flag within the Azure Portal.
You can also notice that a label can be added to the feature flags, this is useful to create groups of features.
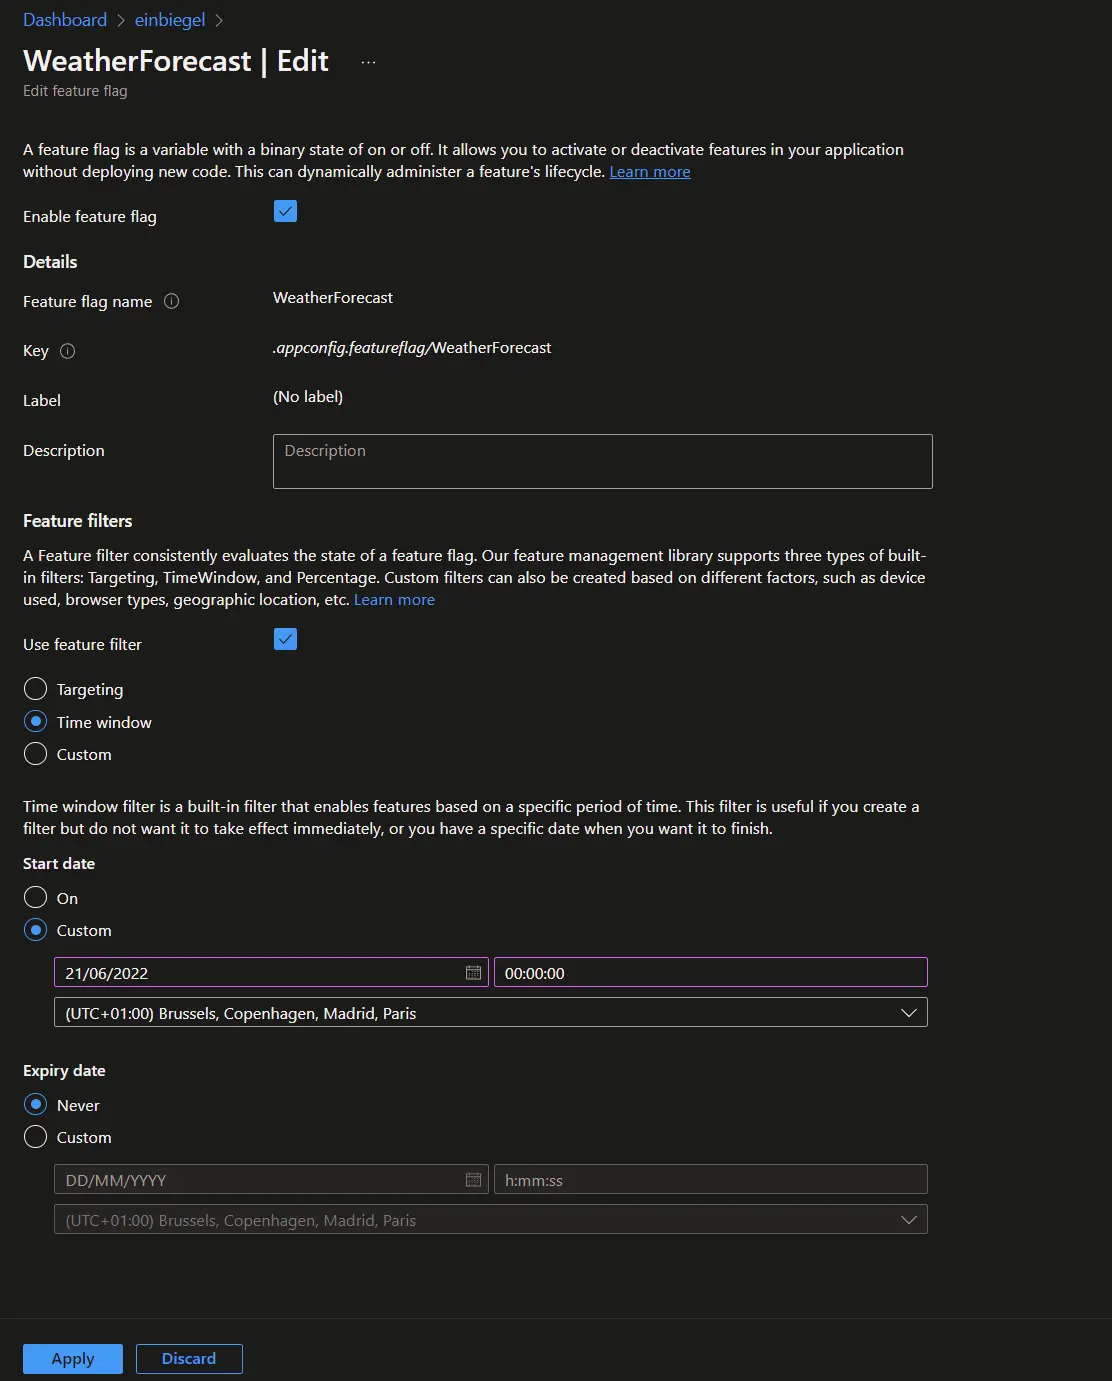
The configuration view of the feature flag looks like this:
To use the Azure Feature Management in code, first install the needed NuGet packages.
Before we can use the Azure Feature Management, we first need to configure the Azure App Configuration. During the configuration, we connect to the specified Azure resource and enable the feature flags to feature. While we do that, we also have the option to define which feature flags need to be registered based on their label.
The Azure Configuration can further be tweaked to fit your needs, e.g. set the cache duration, for more information about all the options sees the docs.
In the example below, we read all the feature flags that don't have a label defined, and also the feature flags for the current environment. The order is important here because the latter overrides the former. Using this approach makes it easy to enable features for all environments (feature flags without a label), except for the production environment (feature flags with "Production" as the label).
While using the Azure Feature Management, don't forget to register the feature flag management feature, and the filters that are used, just as before in the previous examples that aren't using Azure.
As the last step, the feature settings from the appsettings.json file can be removed, Azure is now the owner of it.
Conclusion
In this post, we started off with a naive approach to implementing a feature flag. It required us to recompile and redeploy the application in order to change the application's behavior.
The first step towards a better solution was to refactor the implementation by relocating the feature flag configuration from the code into the appsettings.json file. As result, the feature flag was declarative and the application could be redeployed (with a different behavior) without recompiling it and thus making it easy to turn off certain features in a specified environment. As a side-effect, the application now also meets the criteria of a twelve-factor app.
To introduce a standard the next step was to use the .NET Feature Management Api.
An additional benefit of using the Feature Management Api is that we have the possibility to target specific users.
Beyond only having an application-wide feature flag, a feature flag can be configured based on different conditions.
This feature is called a "filter", and the Feature Management Api has three filters built-in, the PercentageFilter, TimeWindowFilter, and TargetingFilter filters
What I like the most about the Feature Management Api is that it doesn't require us to change the way how we verify if a feature flag is enabled or not in code, because everything is done by having a configuration.
Lastly, to give us maximum flexibility, the Azure Feature Management was added.
Instead of storing the configuration in the appsettings.json file, the feature flags are now managed within the Azure Portal.
We now aren't obligated to restart the application when we make changes to the configuration before those changes take effect.
After making changes to the configuration, the application automatically updates at run-time via the dynamic configuration.
Incoming links
Outgoing links
Feel free to update this blog post on GitHub, thanks in advance!
Join My Newsletter (WIP)
Join my weekly newsletter to receive my latest blog posts and bits, directly in your inbox.
Support me
I appreciate it if you would support me if have you enjoyed this post and found it useful, thank you in advance.
